It sounds like you have put a LOT of thought into the spacer idea for creating the clapboard appearance. Would it be easier to implement a way to stabilize the fence if you gave it the same amount of thought. Maybe something like drilling a row of small holes across the table 1/4" apart. Inserting a pin into the hole would make a positive stop for your fence. Or make an improved clamping devise for the fence itself. I admire the way you figure out these obstacles Crag. You've got a lot of good ideas.
-
HO Scale-
Just saw your comment. Don't know why I missed it. Interesting idea to make some sort of crossfeed like table with pins marked out. I did end up buying some aluminum strips of various widths to see if can't stack them in a way to get the various widths. I was thinking of just using double stick table on the table saw and tape the strips down.
A crossfeed table or something similar seems a tad safer and maybe easier. I'll have to look to see if I have anything that might work.
-
-
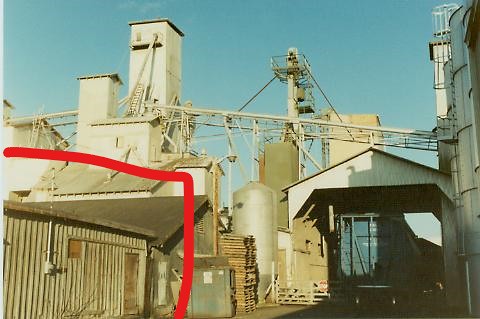
Some reference photos of the upcoming project.
So in typical fashion, I dug around in my photos and found as many of the pictures I have of these two buildings.
Lower left corner shows the building. Electrical meter to door are part of the “Acme Pawn”. This section looks to be board and batten. In this photo the door and small upper window exist. Date is supposedly 1988. This is probably the most accurate of this side for my modeling date based on the feed mill construction as well.

Same angle, post 1988. I’m guessing late 90’s early 2000’s. Again date based on feed mill construction. I know the big silos out front got removed in the late 90’s. Roof has been upgraded to sheet metal, and the door and window are missing as the siding has been replaced with sheet metal siding.

Same angle, similar date in color. I suspect that it’s the same photo original vs above cropped and black and white.

The tax assessors file calls out the middle of the building divided by shiplap. This is where I’m guessing the original structure and false front ends.
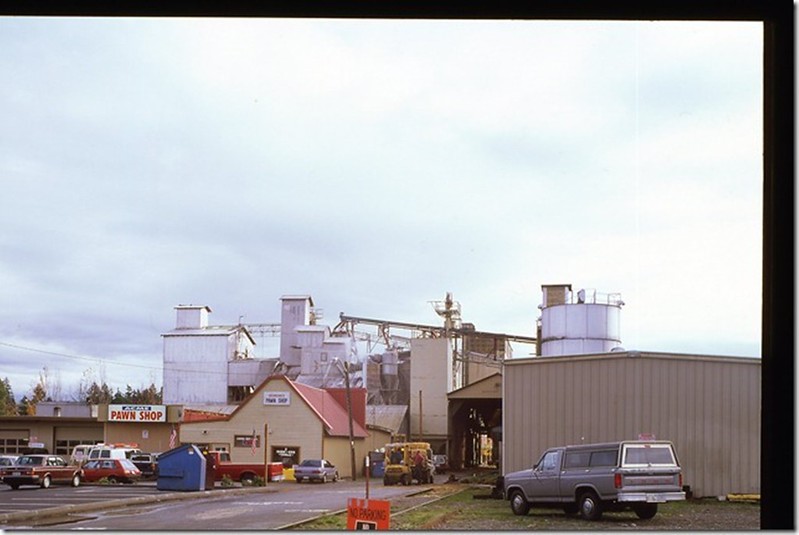
Now on to the ‘front’ view. Late 80’s time frame. Building labeled as “Acme Surplus”. I’m going to try digging around in the local paper to see if I can find anything about a grand opening as the “Welcome Open (for) Business” sign looks fairly clean. The tax assessor files said it was two businesses that occupied this building but from this angle it looks like one. Can’t tell if one of the front doors has been removed due to tree in the way. Also a side window on the shiplap siding, and far back you can still make out the door and small window by the electrical meter. Yellow building has no name but that’s the Eastside Mower & Repair Shop.

Not sure the date but mid to late 90’s. Side wall has changed. And one of the front doors has been removed. No tree. The Eastside Mower & Repair shop is the square looking building labeled “Acme Pawn Shop”. The false front building name is now “Redmond Pawn Shop”

Limited Side views. Click the link to see the full photo but in the far background past Hobby Town, the roof line of both Eastside Mower and Acme Pawn can be seen. The Pawn shop extension slopes towards the railroad tracks, while the other building slopes parallel to the tracks.
 [/url]DSCF5271 by Craig Townsend, on Flickr
And the final, I couldn’t find anything other than this photo… I’m guessing this is a side door/entrance to the mower repair shop.


Cropped in close…
 21314542_1504724516237838_6180989752442894506_n by Craig Townsend, on Flickrx
Next up some foam core mockups… And yes these are ‘small’ compared to the big feed mill next door!
Follow along on Facebook as well.
https://www.facebook.com/groups/424898032713171/Comment
-
Warren K
Here's my solutions to styrene storage. Foamcore and hot glue.
I started with a drawer for cut offs. These are bigger chunks than strips but not full sheets ( say anything less than 2x2 sq).
I started at the bottom with .010-.040" because I don't use those as much. This is mostly strips.

The next layer is chunks of .040 and .060 bigger between 2x2 and 6x6.
On top of this is tubes, rods, shapes, etc along with .125 chunks.


Each has it's own foam core box that I can take out as needed.
Then on the drawer above that, I do something similar with strip stock.
I cut 1/4" wide strips of foam core and hot glued them to a base, and labeled them with the size and part number. Again starting with the least common size to the most common size. I'm slowly trying to build up the entire stock of Evergreen and Plaststruct but its a long and expensive process. My go to thing is just grab a few strips each time I visit the only hobby shop (mostly RC cars).


This is the drawer I have left to sort. It's mostly shapes. My plan is to create a shapes section just like the strips, and try and try and have on hand at least 2 packages of shapes. I seem to go through shapes faster than strip (well, and I can cut my own strips)

Then I have large sheet storage. The big pieces that are smaller than 4'x 4' are stored right next to the workbench between the cabinet and the air compressor.

This is mostly .060, .030, and .125 stock.
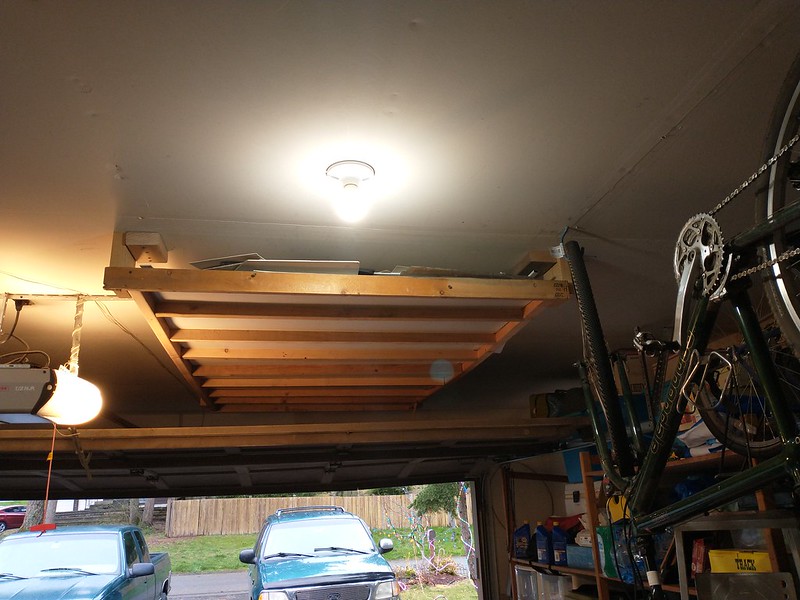
Then I have what I call deep storage. This is the 4'x8' pieces and/or pieces bigger than 4' sq. This is overhead storage over the garage. Right now I have .030, .040, .060, and .125. This stuff is a pain to get down, but it gets cut down when needed. The big sheets I try to keep as big as possible for structure building, rolling stock etc. I end up cutting a lot of the scraps of 4' sq into smaller chunks and using those.

 Last edited by craigtownsend; 01-02-2023, 07:51 PM.Follow along on Facebook as well.
https://www.facebook.com/groups/424898032713171/Comment
-
I am both impressed and inspired by your styrene storage solutions. I am trying to be more organized, and this provided me with some ideas. -
Thanks Eric. Glad it's helpful. I took the time yesterday and built a few more pull out drawers and now I think I have all but some .080-.0100 stock available to be purchased and then organized. It helped a lot. I didn't realize just how much I had until I took the time to organize. Now I want to organize some other non modeling tool sections in the garage.
One thing I'd do over again is make a back side to the foamcore or maybe even boxes to keep them sliding out. But way better overall than the mess I had hanging on the pegboard for years.
-
-
Last day of winter break before I head back to school tomorrow, so I know the program I've been making on projects will probably slow down again.
1. Got the mock-up done for the pawn shop. The build challenge officially starts on the 7th, so I'm in a bit of a holding pattern if I want to follow the rules..

It definitely has an interesting shaped and design with the addition in the back.

2. Since I had the foam core out with the hot glue, I got motivated again to do some more styrene storage organization. I think I still need to make a container for angles, half round and round shapes. Once that's done, I think I'll build some bigger boxes for large chunks.
3. Worked on soldering up the rest of the framework on some silos. I ran out of brass tube so I either wait until I get more and fight the "solder and unsolder old pieces demon" or bash the rest with CA and styrene tube. I always forget the scale of things until I grab a figure..
Before I tackle more complicated brass projects I've learned a few things. Make a jig to hold everything and get some more temperature range solder. Right now I just have electronic solder and silver solder for pipe. I'm generally getting better with the resistance soldering unit but I need more practice and some different tips ( probe and clip for one)

 Follow along on Facebook as well.
https://www.facebook.com/groups/424898032713171/Comment
-
What happened to this guy down on the ground grasping his knee? Fall off the catwalk? Seriously Craig, this is going to be a huge model. Thanks for sharing.HO ScaleComment
-
That figure on the ground is a guy I bought just recently from Modelu? in the UK. He's supposed to be a eventual engineer, but I haven't painted him yet. I was actually disappointed in the quality of print from those guys for the price I paid. One of the reasons I haven't painted the guy yet as I'm not sure how I want to tackle smoothing out the layer lines.
The standing guy is one of the first not my own designer prints I bought off Shapeways years ago.
Not the best print from Shapeways but hey it's a figure! I think that the person that uploaded it to Shapeways now has shared that file ( and some other people) so I might be able to print more off at home now.
One of these days, I should pull out a HO scale model just for comparison.
I said the Pawn Shop building was small and that's even 16" x 32".
-
-
So I'll post a quick update on my "distracted for 30 days" project.
Got all the shiplap siding cut and glued onto the substructure.
I should have cut the doors out and recessed them a bit but I was lazy and just kept it as it is.i can always go back and cut them out and recess them.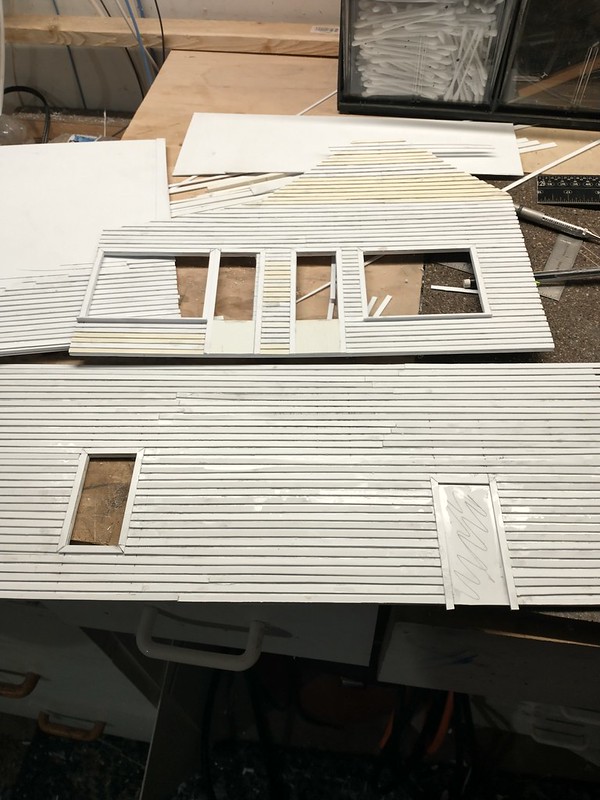

Still need to cut about 48 2" or 3+ strips for the last two walls that are board and batten. I'll have to check to see how big the other ones are.
Looking around at in the garage, I remember I had a tub of concrete patch stuff. Gave me an idea for a flat roof coating and/or a asphalt road.

I slapped a light layer on some scrap to see if it would even stick.

Then after it dried gave it a layer of black craft paint. I think it might work for a flat roof coating. Has a slightly smaller texture than the anti skid tape I used for shingles. The anti skid stuff has a little bigger texture than I wanted.

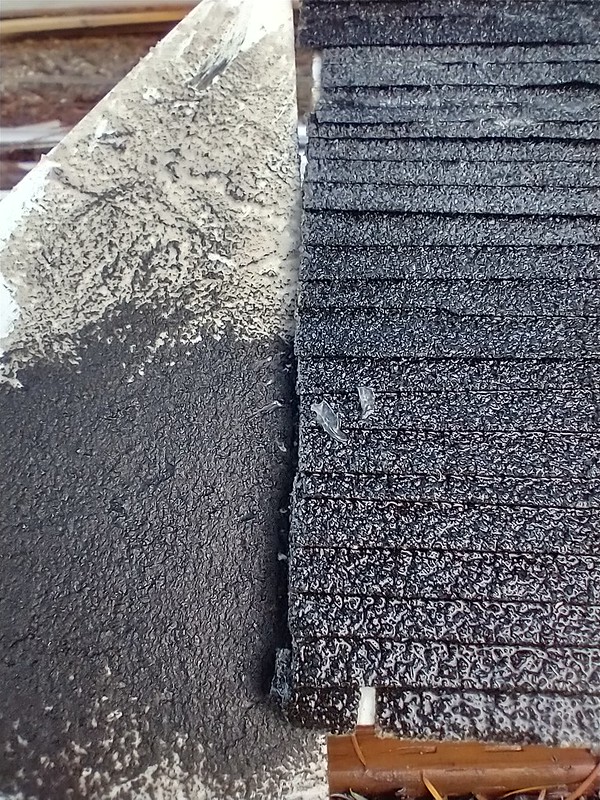
Now I'm wondering if I cut a cross profile of a roof, if I could skim coat this stuff in the shape of roof layers.Follow along on Facebook as well.
https://www.facebook.com/groups/424898032713171/Comment
-
Comment
-
Got it all glued up this past weekend, and even got a layer of rattle can primer on it. Still trying to figure out how I want to approach the original section of roof. I'm not sure I want to go the anti-skid tape route for shingled roof as the depot model is showing signs of wear only after a year (and this is roof #2). I'm half tempted to do the roof as a metal roof. Either that or cut 1' wide strips of styrene and build up the shingles with styrene and paint flat black and don't worry about the texture. I think I've got the overall look of the building nailed fairly well so far.
 Similar angle. I should have made the clapboard wall a foot or two higher (and thus the roof would have a slightly less steep pitch, but I think it still works.
 Follow along on Facebook as well.
https://www.facebook.com/groups/424898032713171/Comment
-
I think it does a reasonable job as well. I'm not to concerned about this one being an exact prototype. I should have tried drawing up the building in SketchUp just to double check. But it's kinda nice to just build to the eye. Hard to make sure everything looks right when you have a limited time and limited photos.
-
As for the texture Craig, could you cover the final material with glue and sprinkle on fine sand like sandblasting sand and then spray paint it?
Or, what about getting some of the stone texture paint, spray it on then spray it with the proper color?The Little Rock Line Blog
Rule #1 of model railroading.
It's probably responsible for the greatest number of shoddy layouts because no one feels compelled to improve themselves. Meh, good enough...Comment
-
This might work afterall. Glad I have a pile of .020 sheets as in a half dozen 4x8 sheets.. 😜

I'm actually not sure how many other buildings will need this style of roofing. The Issaquah depot comes to mind right away.Follow along on Facebook as well.
https://www.facebook.com/groups/424898032713171/Comment
-
A few more trim pieces once I study the prototype photos some more. It looks like it drops down like a C channel.
But the roof is done finally! And based on my 1:1 and 1:29 roofing experience, I'm a much better 1:1 roofer.

Got to start digging through the stash of paint to find some colors. A few shades of brown and then a red color. I'm pretty sure I can find something that will work.

The bigger question is what project next?
1. Keep working on my feed mill?
2. Build track? 3. Finish some half stalled projects?
4. Kadee couplers installed?
5. More buildings?
6. Weathering?
7. Super secret project idea I want to get done for the next RPM?
Follow along on Facebook as well.
https://www.facebook.com/groups/424898032713171/Comment
-
So after completing the 30 day, $30 challenge that got me to complete my model of Acme Surplus, I turned my attention back towards T-D Feeds. Since I was struck by the desire to tear my eyes out again, I started making siding strips and started siding construction on one of the original buildings of T-D Feeds build around 1918.
This building is 114' long by 42' wide. Kinda some odd dimensions, but that's what it is according to the tax records.

This is a sketch of the next chunk over at 56' by 114'.
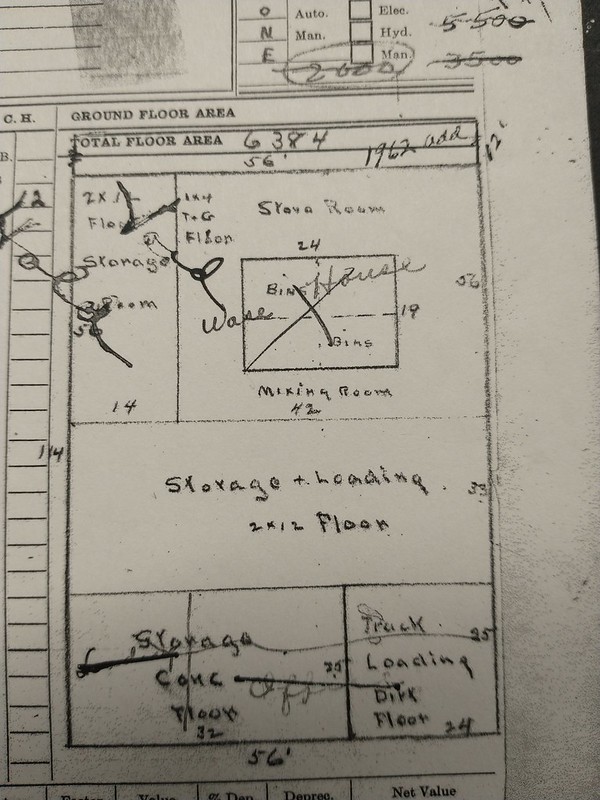
I figured the rear wall was the quickest and easiest to make. Studying the photos it has an odd no longer in use man door 18"-24" above ground, a rear vent of some sort and a sliding door.

Follow along on Facebook as well.
https://www.facebook.com/groups/424898032713171/Comment
-
Forgot to add final pictures of Acme Surplus here.


I'm waiting final placement until I get T-D Feeds done and set in place. Everything else kinda falls around that.Follow along on Facebook as well.
https://www.facebook.com/groups/424898032713171/Comment
-
Try number two here. First post was acting funny.
One of the defining features of T-D Feeds to me is the store front area that was a long Cleveland St. When I think of T-D Feeds this is what immediately comes to mind.


Since I'm working on this sub structure at the moment, I've got to readdress the rock wall at the front. Years ago I made a plaster mold, carved the details, then RTV cast the plaster and made a resin copy. Thankfully I still have the RTV mold of this, but I've only got the left side. I had carved the right side but never made a mold of the right side.


The other thing is the awning and the angled windows. I'm planning on detailing the interior as this front edge of the building will be very close to the front of the layout.
Now sure how I want to tackle the right side rock wall.
1. Plaster, RTV, resin method again
2. 3D print (that would be an interesting attempt)
3. Use some foamed PVC and carve the rocks.
In the meantime as I ponder this, I've got 114' x 2 of roof that needs shingles put on!
Here's the other side wall done.
Follow along on Facebook as well.
https://www.facebook.com/groups/424898032713171/Comment
-
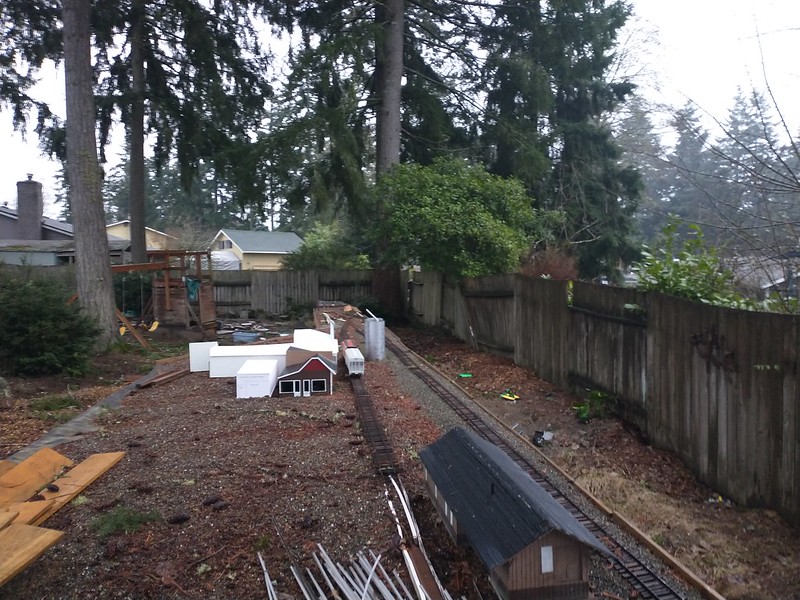
Looking great. Amazing work. Back yard will look great when done.Comment
-
Thanks Tony. I think I've committed myself to finishing Redmond completely before I extend the layout the rest of the way. I say that now in the depths of winter so it will be interesting to see what happens as the weather turns better.
I have an unofficial goal of spring of 2024 as a fully operational layout. We'll see 8f that actually holds true.
-
Comment